
What does a girl do on a very snowy, snowed in day? When the wind is howling and the temps are flirting with single didgits?
Make a snowflake pillow. And the best part... it's made out of BUTTONS!
This project was so fun. It took just over an hour from picking out all the white buttons from my button jar till I stuffed the pillow cover with an insert.
Even if it's not snowy where you are... this pillow will bring a little winter white to your decor...

I'm participating in
NO-SEW WARM AND COZY HOME
The link to all the other warm and cozy no-sew projects are at the bottom this post.

The Button Snowflake Pillow has to be one of my very favorite projects I've ever done. I just loved going through all those pearly white buttons and making something out of them. Some of the buttons were my grandmother's.

Here's my inspiration... the snow from my living room window just before sunset...
BRRRRRRR!

STONEGABLE NO-SEW BUTTON SNOWFLAKE PILLOW
white buttons
pillow cover
hot glue gun
pencil
ruler
pillow insert
pillow insert

1. Gather buttons and put them on a large plate. This makes them easy to pick through.
2. Find the center of your pillow and lightly draw a long vertical line intersecting the center (mine was 10 inches on each side), a long horizontal line the same size intersecting the center and even on both sides.
Make a 2 diagonal lines even on both sides (mine were 7 inches) intersecting the center not as long as the vertical and horizontal lines.
You will have 8 spokes.
The horizontal and vertical spokes will be longer and the same distance from the center.
And 4 diagonal spokes all the same size but smaller than the horizontal and vertical spokes.
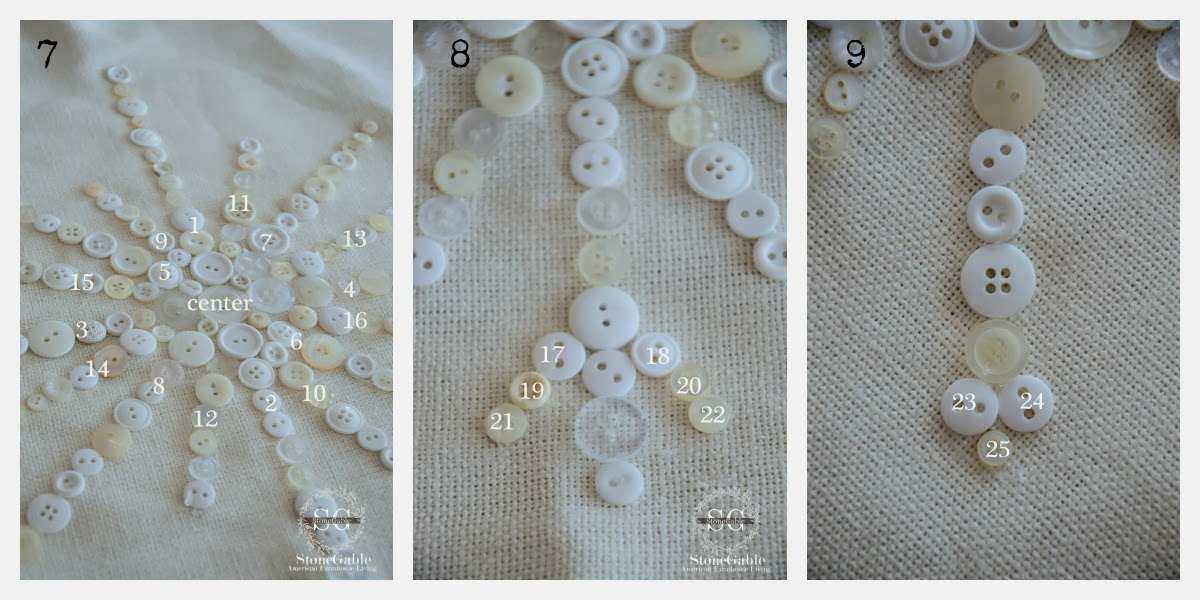
3. Glue one large button to the center of the spokes. Follow the diagram. Glue 2 big button to the vertical line, as shown, #1 and 2.
Glue 2 other big buttons to the horizontal line, # 3 and 4.

4. Add button to diagonal lines, 5a, 5b, 6a, 6b, 7a, 7b, 8a, 8b. See diagram.
5. Glue buttons to the vertical line. Use different hues and sizes of buttons.
6. Glue buttons to the horizontal line. Use different hues and sizes of buttons.
7. Glue buttons to diagonal spokes, 5,6,7 and 8. See diagram.
Draw small spoke lines 9, 10, 11, 12, 13, 14, 15 and 16. I made mine 5 inches long.
Glue small buttons to spokes 9-16.
8. Add buttons 17-22, according to the diagram, on the vertical and horizontal lines 1,2 3 and 4.
9. Add 3 buttons 23- 25, according to the diagram, on diagonal lines 5,6,7 and 8.

10. Measure a circle around the snowflake centered on the center button. Mark a light dot between the spokes, as shown.
11. Find a button that will fill that space and glue buttons 26-41 into place. It's okay to vary the size of the buttons to make them fill the space.
12. Finished snowflake pattern.
Iron pillow cover and stuff with a down pillow form.
My pillow cover came from the Pottery Barn Outlet. I think it was a 22 inch pillow and my form was 24 inches.

Join 5 other talented blogger for their WARM AND COZY NO-SEW PROJECTS!
I just love love love working with these creative girls!

Remember to


0 comments:
Post a Comment